Monday, 27 April 2015

High-Availability (HA) Apache Cluster - CentOS 7

In this article, I would be walk through the steps required to build a high-availability apache cluster on CentOS 7. In CentOS 7(as in RHEL 7) the cluster stack has been moved to pacemaker/corosync, with a new command line tool(pcs) to manage the cluster.

Environment Description:
The cluster would be of 2-node(centos71 & centos72), iSCSI shared storage will be presented from the node iscsitarget which is around 1GB.
If you want to know on how to share disk from iscsi click here

Objective:
High availability cluster that is serving websites where its document root would be utilising a simple failover filesystem.
In a stable situation, cluster should look something like this:


There is one owner of the virtual IP, in this case that is centos71. The owner of the virtual IP also provides the service for the cluster at that moment. A client that is trying to reach our website via 192.168.229.134 will be served the webpages from the webserver running on centos71 . In the above situation, the second node is not doing anything besides waiting for centos71 to fail and take over. This scenario is called active-passive.

In case something happens to centos71 the system crashes, the node is no longer reachable or the webserver isn't responding anymore, centos72 will become the owner of the virtual IP and start its webserver to provide the same services as were running on centos71


Pre-requsites:
Configure both the cluster nodes with static IP, hostname, and make sure they are in the same subnet and could be reached each other by their nodenames.(either you could add it in /etc/hosts or configure your DNS server)

If you had configured your firewall, make sure you allow cluster traffic(incase if they are active on any nodes), in this example, I had shutdown the firewall.

Installation:
After your basic setup, install packages
[root@centos71 ~]# yum install corosync pcs pacemaker
[root@centos72 ~]# yum install corosync pcs pacemaker

To manage cluster nodes, we will use PCS. this allows us to have a single interface to manage all cluster nodes. By installing the necessary packages, Yum also created a user, hacluster, which can be used together with PCS to do the configuration of the cluster nodes.

[root@centos71 ~]# passwd hacluster
[root@centos72 ~]# passwd hacluster

Next, start the pcsd service on both nodes:
[root@centos71 ~]# systemctl start pcsd
[root@centos72 ~]# systemctl start pcsd

Since we will configure all nodes from one point, we need to authenticate on all nodes before we are allowed to change the configuration. Use the previously configured hacluster user and password to do this.

[root@centos71 ~]# pcs cluster auth centos71 centos72
From here, we can control the cluster by using PCS from centos71 It's no longer required to repeat all commands on both nodes.

Create the cluster and add nodes
[root@centos71 ~]# pcs cluster setup --name webcluster centos71 centos72

The above command creates the cluster node configuration in /etc/corosync.conf
After creating the cluster and adding nodes to it, we can start it
[root@centos71 ~]# pcs cluster start --all
centos72: Starting Cluster...
centos71: Starting Cluster...
[root@centos71 ~]#

check the status of the cluster after starting it:
[root@centos71 ~]# pcs status cluster
Cluster Status:
 Last updated: Sun Apr 26 18:17:32 2015
 Last change: Sun Apr 26 18:16:26 2015 via cibadmin on centos71
 Stack: corosync
 Current DC: centos71 (1) - partition with quorum
 Version: 1.1.10-29.el7-368c726
 2 Nodes configured
 0 Resources configured
[root@centos71 ~]#

Since we have simple cluster, we'll just disable the stonith and ignore quorum device.
[root@centos71 ~]# pcs property set stonith-enabled=false
[root@centos71 ~]# pcs property set no-quorum-policy=ignore

Next, create a partition on the 1GB LUN  – this will house a filesystem to be used as the DocumentRoot for our Apache installation.
I had configured multipath for the device, hence install device-mapper* on both nodes. 
[root@centos71 ~]# mpathconf --enable
[root@centos72 ~]# mpathconf --enable
[root@centos71 ~]# systemctl multipathd start
[root@centos72 ~]# systemctl multipathd start

Create partiton from any of the one node, and then only 'partprobe' the second by default you would have had the same mapper device for the newly added iSCSI device. 
[root@centos71 ~]# lsblk -i
sdb                       8:16   0 1016M  0 disk
`-mpatha                253:6    0 1016M  0 mpath
  `-mpatha1             253:7    0 1015M  0 part
[root@centos71 ~]#

[root@centos72 ~]# lsblk -i
sdb                       8:16   0 1016M  0 disk
`-mpatha                253:5    0 1016M  0 mpath
  `-mpatha1             253:6    0 1015M  0 part
[root@centos72 ~]#

[root@centos71 ~]# fdisk /dev/mapper/mpatha
[root@centos71 ~]# partprobe
[root@centos71 ~]# mkfs.ext4 /dev/mapper/mpatha1
[root@centos71 ~]# mount /dev/mapper/mpatha1 /var/www
[root@centos71 ~]# mkdir /var/www/html;mkdir /var/www/error; 
[root@centos71 ~]# echo "apache test page" >/var/www/html/index.html 
[root@centos71 ~]# umount /dev/mapper/mpatha1

Create the filesystem cluster resource fs_apache_shared, and would group it to "apachegroup" which will be used to group the resources together as one unit.
[root@centos71 ~]#  pcs resource create fs_apache_shared ocf:heartbeat:Filesystem device=/dev/mapper/mpatha1 fstype=ext4 directory="/var/www" --group=apachegroup
[root@centos71 ~]#

We will add a virtual IP to our cluster. This virtual IP is the IP address that which will be contacted to reach the services (the webserver in our case). A virtual IP is a resource.
[root@centos71 ~]# pcs resource create virtual_ip ocf:heartbeat:IPaddr2 ip=192.168.229.134 cidr_netmask=24 --group=apachegroup

Create a file /etc/httpd/conf.d/serverstatus.conf with the following contents on both nodes:
[root@centos71 ~]# cat /etc/httpd/conf.d/serverstatus.conf
Listen 127.0.0.1:80
 <Location /server-status>
 SetHandler server-status
 Order deny,allow
 Deny from all
 Allow from 127.0.0.1
 </Location>
[root@centos71 ~]#

Disable the current Listen-statement in the Apache configuration in order to avoid trying to listen multiple times on the same port.
[root@centos71 ~]#  grep -w "Listen 80" /etc/httpd/conf/httpd.conf
#Listen 80
[root@centos72 ~]#  grep -w "Listen 80" /etc/httpd/conf/httpd.conf
#Listen 80

Now that Apache is ready to be controlled by our cluster, we'll add a resource for the webserver
[root@centos71 ~]# pcs resource create webserver ocf:heartbeat:apache configfile=/etc/httpd/conf/httpd.conf statusurl="http://localhost/server-status" --group=apachegroup

Testing:
Browse http://192.168.229.134, it must display a test page. move your resource groups to partner node, where you shouldn't expect any downtime to your apache service.

[root@centos71 ~]# pcs status
Cluster name: webcluster
Last updated: Sun Apr 26 21:20:14 2015
Last change: Sun Apr 26 21:19:09 2015 via cibadmin on centos71
Stack: corosync
Current DC: centos71 (1) - partition with quorum
Version: 1.1.10-29.el7-368c726
2 Nodes configured
3 Resources configured

Online: [ centos71 centos72 ]

Full list of resources:

 Resource Group: apachegroup
     fs_apache_shared   (ocf::heartbeat:Filesystem):    Started centos71
     virtual_ip (ocf::heartbeat:IPaddr2):       Started centos71
     webserver  (ocf::heartbeat:apache):        Started centos71

PCSD Status:
  centos71: Online
  centos72: Online

Daemon Status:
  corosync: active/disabled
  pacemaker: active/disabled
  pcsd: active/disabled
[root@centos71 ~]#

[root@centos71 ~]# pcs resource move webserver
[root@centos71 ~]# pcs status
Cluster name: webcluster
Last updated: Sun Apr 26 21:21:00 2015
Last change: Sun Apr 26 21:20:57 2015 via crm_resource on centos71
Stack: corosync
Current DC: centos71 (1) - partition with quorum
Version: 1.1.10-29.el7-368c726
2 Nodes configured
3 Resources configured

Online: [ centos71 centos72 ]

Full list of resources:

 Resource Group: apachegroup
     fs_apache_shared   (ocf::heartbeat:Filesystem):    Started centos72
     virtual_ip (ocf::heartbeat:IPaddr2):       Started centos72
     webserver  (ocf::heartbeat:apache):        Started centos72

PCSD Status:
  centos71: Online
  centos72: Online

Daemon Status:
  corosync: active/disabled
  pacemaker: active/disabled
  pcsd: active/disabled
[root@centos71 ~]#

you can use df -h  to confirm file system failover, ip addr show to confirm IP address failover.

Saturday, 25 April 2015

Install/Configure iSCSI targets, LUN's, initiators - CentOS

​iSCSI is an acronym for Internet Small Computer System Interface, an Internet Protocol (IP)-based storage networking standard for linking data storage facilities. iSCSI can be used to transmit data over local area networks (LANs), wide area networks (WANs), or the Internet. iSCSI protocol allows clients (called initiators) to send SCSI commands (CDBs) to SCSI storage devices (targets) on remote servers. It is a storage area network (SAN) protocol, allowing organizations to consolidate storage into data center storage arrays while providing hosts with the illusion of locally attached disks. However, the performance of an iSCSI SAN deployment can be severely degraded if not operated on a dedicated network or subnet (LAN or VLAN), due to competition for a fixed amount of bandwidth.
​


Environment: centos 6.5 - iSCSI target 
             centos 7   - iSCSI initiators

Diagram is self explanatory for the environment on which I would explain below article in three sections
I have attached one HDD on the target server.

Section 1: Install iscsi target 
Section 2: Create LUN using iscsi
Section 3: Install initiators and verify LUN

Section 1 :

- Install the iscsi target package
iscsitarget# yum install scsi-target-utils -y

- start the iscsi service and autostart while system boots.
iscsitarget# /etc/init.d/tgtd start
iscsitarget# chkconfig tgtd on

- Incase firewall is enabled, add rules to allow iptables to discover iscsi targets.
iscsitarget# iptables -A INPUT -i eth0 -p tcp --dport 860 -m state --state NEW,ESTABLISHED -j ACCEPT
iscsitarget# iptables -A INPUT -i eth0 -p tcp --dport 3260 -m state --state NEW,ESTABLISHED -j ACCEPT
iscsitarget# iptables-save
iscsitarget# /etc/init.d/iptables restart

Section 2:
- Check your fdisk utility shows the newly added disk, then partition the drive and change partition type to LVM(8e). save the changes and make sure kernel is aware of the changes made to partition table(partprobe).

iscsitarget# pvcreate /dev/sdb1
iscsitarget# vgcreate vg_iscsi /dev/sdb1
iscsitarget# lvcreate -l 100%FREE -n lv_iscsi vg_iscsi
iscsitarget# pvs;vgs;lvs
  PV         VG       Fmt  Attr PSize    PFree
  /dev/sdb1  vg_iscsi lvm2 a--  1016.00m    0
  VG       #PV #LV #SN Attr   VSize    VFree
  vg_iscsi   1   1   0 wz--n- 1016.00m    0
  LV       VG       Attr       LSize    Pool Origin Data%  Meta%  Move Log Cpy%Sync Convert
  lv_iscsi vg_iscsi -wi-ao---- 1016.00m
iscsitarget#

- we need to define the LUN in the target configuration, so it will be available for client machines(initiators).
iscsitarget# cat -n /etc/tgt/targets.conf
    16  default-driver iscsi
    17
    18  <target iqn.2015-04.com.test:apache:lun1>
    19          backing-store /dev/vg_iscsi/lv_iscsi
    20  </target>

briefly, the fields are:
- iqn, iSCSI Qualified Name 
- date (yyyy-mm),  that the naming authority took ownership of the domain
- reversed domain name of the authority
- Optional ":" prefixing a storage target name specified by the naming authority

- reload the configuration
iscsitarget# /etc/init.d/tgtd reload

- show target and LUN status
iscsitarget# tgtadm --mode target --op show
Target 1: iqn.2015-04.com.test:apache:lun1  <<=== iSCSI Qualified Name
    System information: 
        Driver: iscsi
        State: ready   <<=== iSCSI is Ready to Use
    I_T nexus information:
        I_T nexus: 1
            Initiator: iqn.1994-05.com.redhat:905dbea49e0
            Connection: 0
                IP Address: 192.168.229.132
        I_T nexus: 2
            Initiator: iqn.1994-05.com.redhat:488c35a56511
            Connection: 0
                IP Address: 192.168.229.133
    LUN information:
        LUN: 0  <<==== Default LUN ID reservered for controller  
            Type: controller
            SCSI ID: IET     00010000
            SCSI SN: beaf10
            Size: 0 MB, Block size: 1
            Online: Yes
            Removable media: No
            Prevent removal: No
            Readonly: No
            Backing store type: null
            Backing store path: None
            Backing store flags:
        LUN: 1 
            Type: disk
            SCSI ID: IET     00010001
            SCSI SN: beaf11
            Size: 1065 MB, Block size: 512  <<== Lun size defined in the target
            Online: Yes  <<===  Lun is ready to be used 
            Removable media: No
            Prevent removal: No
            Readonly: No
            Backing store type: rdwr
            Backing store path: /dev/vg_iscsi/lv_iscsi
            Backing store flags:
    Account information:
    ACL information:
        ALL
iscsitarget#

Section 3:

On the clients, install initiator package. 
iscsiinitiator1# yum install iscsi-initiator-utils.x86_64
iscsiinitiator1#

iscsiinitiator2# yum install iscsi-initiator-utils.x86_64
iscsiinitiator2#

- discover the share from the target server. 
iscsiinitiator1# iscsiadm -m discoverydb -t st -p 192.168.229.130 -D
192.168.229.130:3260,1 iqn.2015-04.com.test:apache:lun1
iscsiinitiator1#

iscsiinitiator2# iscsiadm -m discoverydb -t st -p 192.168.229.130 -D
192.168.229.130:3260,1 iqn.2015-04.com.test:apache:lun1
iscsiinitiator2# 

- To attach LUN to client's local system, you will be required to authenticate with target server and allow to login to LUN.
iscsiinitiator1# iscsiadm -m node -T iqn.2015-04.com.test:apache:lun1 -p 192.168.229.130:3260 -l
iscsiinitiator1#

iscsiinitiator2# iscsiadm -m node -T iqn.2015-04.com.test:apache:lun1 -p 192.168.229.130:3260 -l
iscsiinitiator2#

- you can list your block devices from the initiators(lsblk), where you could see new disk. Now, you can create partition, format and mount the file system to use. optional, can be appended in /etc/fstab if you need it to be mounted after reboots.
iscsiinitiator1# lsblk -i 
sdb                       8:16   0 1016M  0 disk
iscsiinitiator1#

iscsiinitiator2# lsblk -i 
sdb                       8:16   0 1016M  0 disk
iscsiinitiator2#

Wednesday, 1 April 2015

Build your RPM

Since, I had an local repository file where I wanted to distribute it to the YUM repository, so had to created an RPM file as explained below

Objective: Demonstrate a simple scenario on how to build RPM. 


Environment: CentOS 6.6 (X86_64) 

Install required RPM 

#yum install -y rpm-build rpmdevtools

Create user for RPM build

# useradd -m rpmbld
# passwd rpmbld

Build RPM

login with the rpmbld account and from the home directory create the directory structure.
Creates the directory rpmbuild with several sub-directories.

~]$ id
uid=501(rpmbld) gid=501(rpmbld) groups=501(rpmbld)
~]$ rpmdev-setuptree 
~]$ echo $?
0
~]$ 

~]$ cd rpmbuild/
~]$ ls
BUILD  RPMS  SOURCES  SPECS  SRPMS
~]$ 

Create compressed content with RPM content

Change to the SOURCE directory, representing directory structure with RPM name,version and target file system. here, I use /etc/yum.repos.d copy desired repo file into the rpms structure. Once after that gzip all of that.

~]$ cd rpmbuild/SOURCES/
~/rpmbuild/SOURCES]$ ls
~/rpmbuild/SOURCES]$ mkdir -p localrepo-1/etc/yum.repos.d
~/rpmbuild/SOURCES]$ cp /tmp/centos66.repo localrepo-1/etc/yum.repos.d
~/rpmbuild/SOURCES]$

~]$ ls
localrepo-1
~/rpmbuild/SOURCES]$ 

~/rpmbuild/SOURCES]$ tar -zcvf localrepo-1.tar.gz localrepo-1/
localrepo-1/
localrepo-1/etc/
localrepo-1/etc/yum.repos.d/
localrepo-1/etc/yum.repos.d/centos66.repo
~/rpmbuild/SOURCES]$

SPEC skeleton

Instructions for the build process are created in the rpmbuild/SPECS directory. rpmdev-newspec <filename> used to create a sample file in your current directory.Edit as required.

~]$ cd rpmbuild/SPECS/
~/rpmbuild/SPECS]$ 

~/rpmbuild/SPECS]$ rpmdev-newspec localrepo.spec
Skeleton specfile (minimal) has been created to "localrepo.spec".
~/rpmbuild/SPECS]$

~/rpmbuild/SPECS]$ ls
localrepo.spec
~/rpmbuild/SPECS]$ 

:~]$ cat rpmbuild/SPECS/localrepo.spec 
Name:           localrepo
Version:        1 
Release:        0
Summary:        Centos repository
Group:          System Environment/Base
License:        GPL
URL:            http://sunlnx.blogspot.in
source0:        localrepo-1.tar.gz
buildarch:      noarch
BuildRoot:      %{_tmppath}/%{name}-buildroot

%description
 Create YUM repository pointing to local centos/redhat repository.

%prep
%setup -q

%install
mkdir -p "$RPM_BUILD_ROOT"
cp -R * "$RPM_BUILD_ROOT"

%clean
rm -rf $RPM_BUILD_ROOT

%files
%defattr(-,root,root,-)
/etc/yum.repos.d/centos66.repo
:~]$

RPMBUILD

you can now use the rpmbuild process to create RPM with -bb for binary rpm without src rpm.

:~]$ rpmbuild -v -bb rpmbuild/SPECS/localrepo.spec 
Executing(%prep): /bin/sh -e /var/tmp/rpm-tmp.RjS32s
+ umask 022
+ cd /home/rpmbld/rpmbuild/BUILD
+ rm -rf localrepo-1
+ /bin/tar -xf -
+ /usr/bin/gzip -dc /home/rpmbld/rpmbuild/SOURCES/localrepo-1.tar.gz
+ STATUS=0
+ '[' 0 -ne 0 ']'
+ cd localrepo-1
+ /bin/chmod -Rf a+rX,u+w,g-w,o-w .
+ exit 0
Executing(%install): /bin/sh -e /var/tmp/rpm-tmp.qqYUfq
+ umask 022
+ cd /home/rpmbld/rpmbuild/BUILD
+ cd localrepo-1
+ mkdir -p /home/rpmbld/rpmbuild/BUILDROOT/localrepo-1-0.i386
+ cp -R etc /home/rpmbld/rpmbuild/BUILDROOT/localrepo-1-0.i386
+ /usr/lib/rpm/check-rpaths /usr/lib/rpm/check-buildroot
+ /usr/lib/rpm/brp-compress
+ /usr/lib/rpm/brp-strip
+ /usr/lib/rpm/brp-strip-static-archive
+ /usr/lib/rpm/brp-strip-comment-note
Processing files: localrepo-1-0.noarch
Requires(rpmlib): rpmlib(CompressedFileNames) <= 3.0.4-1 rpmlib(PayloadFilesHavePrefix) <= 4.0-1
Checking for unpackaged file(s): /usr/lib/rpm/check-files /home/rpmbld/rpmbuild/BUILDROOT/localrepo-1-0.i386
Wrote: /home/rpmbld/rpmbuild/RPMS/noarch/localrepo-1-0.noarch.rpm
Executing(%clean): /bin/sh -e /var/tmp/rpm-tmp.lBmbql
+ umask 022
+ cd /home/rpmbld/rpmbuild/BUILD
+ cd localrepo-1
+ rm -rf /home/rpmbld/rpmbuild/BUILDROOT/localrepo-1-0.i386
+ exit 0
:~]$

Test your build custom RPM's:

:~]# rpm -qiaf /home/rpmbld/rpmbuild/RPMS/noarch/localrepo-1-0.noarch.rpm
Name        : localrepo                    Relocations: (not relocatable)
Version     : 1                                 Vendor: (none)
Release     : 0                             Build Date: Wednesday 01 April 2015 05:18:03 AM IST
Install Date: (not installed)               Build Host: redhat
Group       : System Environment/Base       Source RPM: localrepo-1-0.src.rpm
Size        : 110                              License: GPL
Signature   : (none)
URL         : http://sunlnx.blogspot.in
Summary     : Centos repository
Description :
 Create YUM repository pointing to local centos repository.
:~]# 

:~]# rpm -ivh /home/rpmbld/rpmbuild/RPMS/noarch/localrepo-1-0.noarch.rpm
Preparing...                ########################################### [100%]
   1:localrepo              ########################################### [100%]
:~]# 

:~]# ls -l /etc/yum.repos.d/centos66.repo 
-rw-r--r-- 1 root root 110 Apr  1 05:18 /etc/yum.repos.d/centos66.repo
:~]# 

this is how the custom RPM's are build, hope this tutorial can help you all for your custom RPM builds.
sharing in public, re-share for all. 

Monday, 23 March 2015

SLE 11 SP3 to SLE 12 - upgrade methods explained

SLE allows to update an existing system to the new version, for example, going from SLE 11 SP3 to SLE 12. No new installation is needed. Existing data, such as home and data directories and system configuration, is kept intact. You can update from a local CD or DVD drive or from a central network installation source.

Note: Before updating, copy existing configuration files to a separate medium (such as tape device, removable hard disk, etc.) to back up the data. This primarily applies to files stored in /etc as well as some of the directories and files in /var and /opt. You may also want to write the user data in /home (the HOME directories) to a backup medium.

Environment: SLES 11 SP3
Kernel sles11sp3: 3.0.76-0.11(before up-gradation)
kernel sles12sp0: 3.12.28-4 (after up-gradation)

To upgrade your system this way, you need to boot from an installation source, like you would do for a fresh installation. However, when the boot screen appears, you need to select Upgrade (instead of Installation). The installation source to boot from can be one of the following:
- Local installation medium -(like a DVD, or an ISO image on a USB mass storage device)
- Network installation source -You can either boot from the local medium (like a DVD, or an ISO image)and then select the respective network installation type, or boot via PXE.

Objective: 
- Upgrade using network installation source using CDROM.
- Upgrade using network installation source using PXE.
- Perform an automated migration.

If you want to start an upgrade from a network installation source, make sure that the following below requirements are met, and I would leave it to reader to configure accordingly as it was already explained in previous posts (pxe-installation-on-sles-11)

- Network Installation Source - network installation source should be setup.
- Network Connection and Network Services - Both the installation server and the target machine have a functioning network connection. The network must provide the following services: a name service, DHCP(optional, but needed for booting via PXE)

Upgrade using network installation source using CDROM:

- Insert DVD 1 of the SUSE Linux Enterprise 12 installation media and boot your machine. A Welcome screen is displayed, followed by the boot screen.
- Select the type of network installation source you want to use (FTP, HTTP, NFS, SMB, or SLP). Since I had configured using HTTP, I would select HTTP to serve installations.

              Fig 1
   
               Fig 2

Upgrade using network installation source using PXE:
- Adjust the setup of your DHCP server to provide the address information needed for booting via PXE.
- Set up a TFTP server to hold the boot image needed for booting via PXE.
- Prepare PXE Boot and Wake-on-LAN on the target machine.

              Fig 3

- Once you get your screen as (Fig 2)Proceed with the upgrade process, steps are self-explanatory.

Perform an automated migration:

Copy the installation Kernel linux and the file initrd from /boot/x86_64/loader/ of your first installation DVD to your system's /boot directory

#cp -vi DVDROOT/boot/x86_64/loader/linux /boot/linux.upgrade
#cp -vi DVDROOT/boot/x86_64/loader/initrd /boot/initrd.upgrade
where, DVDROOT denotes the path where your system mounts the DVD

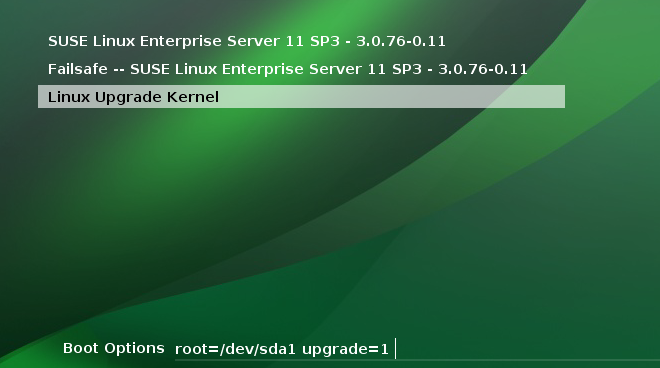
Open the GRUB legacy configuration file /boot/grub/menu.lst and add another section. For other boot loaders, edit the respective configuration file(s). Adjust device names accordingly to your /boot partition.

title Linux Upgrade Kernel
kernel (hd0,0)/boot/linux.upgrade root=/dev/sda1 upgrade=1   
initrd (hd0,0)/boot/initrd.upgrade

Reboot your machine and select the newly added section from the boot menu (here: Linux Upgrade Kernel).

                 Fig 4

- Once you get your screen as (Fig 2)Proceed with the upgrade process, steps are self-explanatory.

- After the upgrade process was finished successfully, remove the installation Kernel and initrd files (/boot/linux.upgrade and /boot/initrd.upgrade). They are useless now and are not needed anymore.

Once the up-gradation is completed, system would be rebooted and booted with new kernel. 

     
                  Fig 5                                             Fig 6

Up-gradations completed successfully.

Friday, 13 March 2015

Installation and Configuring FTPS - Redhat/CentOS

     
​
'vsftpd' is a very popular package for FTP, but poses a security threat because it transfers username,passwords etc in plain text, I would explain in this article as how FTP offers encryption with the help of SSL and TLS protocols.

FTP defines a client-server architecture that uses two ports in-order to establish connectivity between server and the client.
1. Port # 20 : data transfer
2. Port # 21 : autentication connnections.

as a security measure, we have two options that offer secure file transfer capabilities, which are SFTP and FTPS.
SFTP uses a SSH connection to run file transfers over a secure channel, while FTPS uses cryptographic protocols such as SSL( Secure Socket Layer) and TLS (Transport Layer Security).

I would elobrate SFTP protocol in order to setup a secure FTP server using SSL certificates.

Environment: CentOS 6.6/Redhat 6.6 (x86_64)
Packages : vsftpd-2.2.2-12.el6_5.1.i686 / openssl-1.0.1e-30.el6.i686

Install openssl and vsftpd based on your distros:

sudo apt-get install vsftpd openssl  -> Debian
yum install vsftpd openssl           -> Redhat
zypper install vsftpd openssl        -> SuSE

For, data encryption purpose we need to create a SSL certificate(rsa_cert_file)and RSA key file(rsa_private_key) which is used by 'vsftpd' in the configuration file (/etc/vsftpd/vsftpd.conf).

[root@centnode1]# openssl req -x509 -nodes -days 365 -newkey rsa:2048 -keyout /etc/vsftpd/vsftpd.pem -out /etc/vsftpd/vsftpd.pem
Generating a 2048 bit RSA private key
.+++
.............+++
writing new private key to '/etc/vsftpd/vsftpd.pem'
-----
You are about to be asked to enter information that will be incorporated
into your certificate request.
What you are about to enter is what is called a Distinguished Name or a DN.
There are quite a few fields but you can leave some blank
For some fields there will be a default value,
If you enter '.', the field will be left blank.
-----
Country Name (2 letter code) [XX]:IN
State or Province Name (full name) []:Karnataka
Locality Name (eg, city) [Default City]:Bangalore
Organization Name (eg, company) [Default Company Ltd]:testlabs
Organizational Unit Name (eg, section) []:OperatingSystems
Common Name (eg, your name or your server's hostname) []:centnode1
Email Address []:sunlnx@gmail.com
[root@centnode1]#

We need to instruct vsftpd to use that SSL certificate to carry encryption process for data and authentication:

[root@centnode1]# vi /etc/vsftpd/vsftpd.conf

#Turn on SSL
ssl_enable=YES
allow_anon_ssl=NO
force_local_data_ssl=YES
force_local_logins_ssl=YES

#Mention the certificate and key file location
rsa_cert_file=/etc/vsftpd/vsftpd.pem
rsa_private_key_file=/etc/vsftpd/vsftpd.pem

#Enable TLS as it is more secure than SSL
ssl_tlsv1=YES
ssl_sslv2=YES
ssl_sslv3=YES

#allow local users added to the system to use FTP
local_enable=YES

#Prevent anonymous logins
anonymous_anable=NO

#accept FTP write command
write_enable=YES

#chroot users
chroot_local_user=YES
[root@centnode1]#

start/restart your 'vsftpd' to take effect and make sure it start's during the boot time.

[root@centnode1]# service vsftpd start
[root@centnode1]# chkconfig vsftpd on

Now, your FTP server is ready and can add users who can access it. every user will get a separate home directory and with chroot jail activated users are forced to work within their home directories.

[root@centnode1 ~]# useradd ftpuser
[root@centnode1 ~]# passwd ftpuser

Test your SSL connection over 'vsftpd'

when you first try to connect using plain ftp, it must fail asking for encryption.

[root@centnode1 ~]# ftp 192.168.229.130
Connected to 192.168.229.130 (192.168.229.130).
220 (vsFTPd 2.2.2)
Name (192.168.229.130:root): ftpuser
530 Non-anonymous sessions must use encryption.  <<<=====================
Login failed.
ftp>

create few files in 'ftpuser' home directory and get them listed using 'curl' 

[root@centnode1 ~]# curl --ftp-ssl --insecure --user ftpuser:password ftp://ftpserver
-rw-rw-r--    1 500      500             0 Mar 13 06:15 ftptestfile
[root@centnode1 ~]#

ftp-ssl  : tells curl to use ftps
insecure : tells curl not to use any ssl certificate to authenticate and instead just connect.
user     : specifies the username and password

Now, the user 'ftpuser' will be able to use the FTPS services with any FTP clients that supports SSL/TLS such as filezilla. If you want to limit access to FTPS server, but allow people to use FTPS services at the same time, by changing their shell to /sbin/nologin.

Sunday, 4 January 2015

RHEL/CentOS - [Errno 14] PYCURL ERROR 7 - "couldn't connect to host" - FTP

​I had an ERROR which was mentioned in the subject line, I would like to share with you all as how did I troubleshoot.

I had an YUM server repository on which I had installed firewall in recent times, I had set all my INPUT rules to make sure that port 21 is allowed to communicate between the clients. However, FTP client's were able to connect the FTP server on port 21, where as YUM was unable to fetch the repository file and was failing with below ERROR.


# yum list all
Loaded plugins: fastestmirror, security
Loading mirror speeds from cached hostfile
ftp://192.168.156.107/tftpboot/centos6/repodata/repomd.xml: [Errno 14] PYCURL ERROR 7 - "couldn't connect to host"
Trying other mirror.
Error: Cannot retrieve repository metadata (repomd.xml) for repository: centos66. Please verify its path and try again
# 

I tried to download one of the file from the FTP server and I was known that when client is trying for passive connection to the FTP, there was no route to the host to connect.

230 Login successful.
Remote system type is UNIX.
Using binary mode to transfer files.
ftp> ls
227 Entering Passive Mode (192,168,156,107,54,76).
ftp: connect: No route to host
ftp> 

I thought to get the reader to know the below as basic information, hence describing about active/passive methods.

Active mode:

In an active mode configuration, the server will attempt to connect to a random client-side port. So chances are, that port wouldn't be one of those predefined ports. As a result, an attempt to connect to it will be blocked by the firewall and no connection will be established. 


Passive mode:

A passive configuration will not have this problem since the client will be the one initiating the connection.So it would be best for you to configure server to support passive mode FTP. However, passive mode would make your system vulnerable to attacks because clients are supposed to connect to random server ports. To mitigate the risks, a good solution would be to specify a range of ports on your server and then to allow only that range of ports on your firewall.

Firewall was not allowing my passive FTP connection, below steps were been performed to resolve this issue.

-create a file and reboot the server so that Kernel module would be loaded and will be persistent across reboots.


# cat  /etc/sysconfig/modules/iptables.modules 
#!/bin/sh
exec /sbin/modprobe ip_conntrack_ftp >/dev/null 2>&1
#

#chmod +x /etc/sysconfig/modules/iptables.modules
#

# lsmod | grep ftp
nf_conntrack_ftp       10475  0 
nf_conntrack           66229  6 ipt_MASQUERADE,iptable_nat,nf_nat,nf_conntrack_ipv4,xt_state,nf_conntrack_ftp
#

I am now able to connect to my YUM repository with FTP as a protocol.

# ftp ftpserver
230 Login successful.
Remote system type is UNIX.
Using binary mode to transfer files.
ftp> !ls
anaconda-ks.cfg  install.log  install.log.syslog  
ftp> bye
#

# yum list all | wc -l
3287
# 

sharing this article publicly as this could save time for anyone who is facing this ERROR.