Showing posts with label cicd. Show all posts

Monday, 3 August 2020

Monitor PR for merge into master using TeamCity

You would have an automated build using teamcity, however we could use an PR and once they are manually verified and approved we could proceed to merge for master. 

Modify the branch specifications +:refs/pull/*/merge


Once you add the some file in the "feature" branch, it would create an build as we are watching this build in the teamcity. 

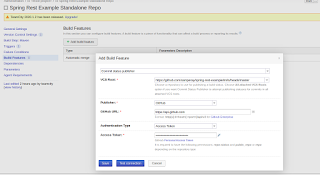
You need to edit the Build Feature and modify the below settings to ensure you have PR for the the build to merge master branch


Once you create a new file in the feature branch, create PR and wait for the build to succeed in the feature branch. 
Once the build is successful it will perform checks for the PR and once the changes are fine fo you, you can merge to master. 


So you have now all the changes from the branch to be in master. Once you have approved the changes, it will start to build to master.


This is how you can configure teamcity to have an manual approach for merging into master branch.

AutoMerge Branch to Master using TeamCity

Create a new VCS repository providing github. I have configured the repository in the root directory of the VCS in the teamcity project. 

<Root project> Contains all other projectsEdit


Created a new branch "feature" and would be modifying the code, once the changes are merged and build is successful then it would automatically merge to the master branch.

Modify the VCS in the "Branch Specification" as +:refs/heads/* which lets the teamcity to check for branches other than the master. 


Select "Triggers" and select for auto trigger from the VCS.

Select "Build Features" and select "Automerge changes" in watch build in branch +:feature when new build is created.


Ensure, you have an agent being attached to the VCS to execute the build.


Sunday, 2 August 2020

TeamCity Server and BulidAgent installations on Centos 7

TeamCity is a Java-based build management and continuous integration server from JetBrains.  
A Freemium license for up to 20 build configurations and 3 free Build Agent licenses is available.

Prerequisites

- Centos 7 to be installed.
- Java to be installed 
- postgresql to be installed. 

Java Installations
# sudo yum install java-1.8.0-openjdk

Postgresql Installations

Install postgresql
# sudo yum install postgresql-server postgresql-contrib

Initialize the database
# sudo postgresql-setup initdb

Start the database
# sudo systemctl start postgresql

Enable postgresql during boot
# sudo systemctl enable postgresql

TeamCity Installations
Download Teamcity tar archive from official website

mkdir /opt/teamcity
cd /opt/teamcity
wget https://download.jetbrains.com/teamcity/TeamCity-2020.1.2.tar.gz
tar -xzvf TeamCity-2020.1.2.tar.gz

Download PostgreSQL JDBC driver
We need to download PostgreSQL JDBC driver in order to use PostgreSQL database for TeamCity.

mkdir -p /opt/teamcity/TeamCity/.BuildServer/lib/jdbc/
wget https://jdbc.postgresql.org/download/postgresql-42.2.14.jar -P /opt/teamcity/TeamCity/.BuildServer/lib/jdbc/

Start service
# cd /opt/teamcity/TeamCity/bin
# ./startup.sh

Stop Service
# ./shutdown.sh

Restart Service
# ./shutdown.sh && ./startup.sh

Configure postgresql
sudo su - postgres
vim data/pg_hba.conf

Modify to md5 at the end for these below lines
# "local" is for Unix domain socket connections only
local   all             all                                     md5
# IPv4 local connections:
host    all             all             127.0.0.1/32            md5
# IPv6 local connections:
host    all             all             ::1/128                 md5
# exit
# systemctl restart postgresql

# psql -U postgres
postgres=# CREATE USER teamcity WITH PASSWORD 'teamcity';
CREATE ROLE
postgres=# CREATE DATABASE teamcity OWNER teamcity;
CREATE DATABASE
postgres=# \q

TeamCity Web
point your browser to teamcity Server IP address and follow these below steps

Step 1: Change the Data DirectoryHere
we will change the data directory to /opt/teamcity/TeamCity/.BuildServer

Step 2: Now we have to setup database connection

Database host[:port] - localhost
Database name: xxxxxx
User name: xxxxxx
Password: xxxxx

Step 3: Accept licence

Step 4: Create Admin account

TeamCity installations has been completed. 

TeamCity BuildAgent Installations
Download Zipfile
We need to download a zip file from the teamcity server to install it on the agent. Replace the server-url with your server ip or server hostname.

mkdir /opt/teamcity
sudo unzip buildAgent.zip
sudo chmod +x bin/agent.sh
vim buildAgent.dist.properties
serverUrl=http://server-ip:8111/
cp conf/buildAgent.dist.properties conf/buildAgent.properties

Start Service
# cd /opt/teamcity/buildAgent/bin
# ./agent.sh

You would need to authorize the agent in the buildserver once its get detected. you can now start your build and work along.

Saturday, 26 August 2017

Installation of Jenkins in Linux

In this blog, I would just summarize installation of jenkins in few steps

1. Jenkins is Java based application, hence install Java version 8
2. Tomcat is required to deploy Jenkins war file, hence install Apache Tomcat version 9
3. Download Jenkins war file
4. Deploy Jenkins war file using Tomcat 
5. Install suggested plugins

Environment: CentOS / Redhat

- Install latest Java version

#yum install java-1.8.0-openjdk

- Download Apache Tomcat 


#tar -xzvf apache-tomcat-9.0.0.M10.tar.gz

#mv apache-tomcat-9.0.0.M10 apache9

- Provide username and password for Apache Tomcat

#mv apache9/conf/tomcat-users.xml apache9/conf/tomcat-users.xml.original
#vim apache9/conf/tomcat-users.xml


<?xml version="1.0" encoding="UTF-8"?>
<!--
  Licensed to the Apache Software Foundation (ASF) under one or more
  contributor license agreements.  See the NOTICE file distributed with
  this work for additional information regarding copyright ownership.
  The ASF licenses this file to You under the Apache License, Version 2.0
  (the "License"); you may not use this file except in compliance with
  the License.  You may obtain a copy of the License at

      http://www.apache.org/licenses/LICENSE-2.0

  Unless required by applicable law or agreed to in writing, software
  distributed under the License is distributed on an "AS IS" BASIS,
  WITHOUT WARRANTIES OR CONDITIONS OF ANY KIND, either express or implied.
  See the License for the specific language governing permissions and
  limitations under the License.
-->
<tomcat-users xmlns="http://tomcat.apache.org/xml"
              xmlns:xsi="http://www.w3.org/2001/XMLSchema-instance"
              xsi:schemaLocation="http://tomcat.apache.org/xml tomcat-users.xsd"
              version="1.0">
<role rolename="manager-gui"/>
<role rolename="manager-script"/>
<role rolename="manager-jmx"/>
<role rolename="manager-status"/>
<role rolename="admin-gui"/>
<role rolename="admin-script"/>
<user username="
​jenkins
" password="
​jenkins
" roles="manager-gui,manager-script,manager-jmx,manager-status,admin-gui,admin-script"/>
</tomcat-users>


#cd apache9/bin
#./startup.sh

[user@localhost bin]$ ./startup.sh
Using CATALINA_BASE:   /home/vagrant/tomcat9
Using CATALINA_HOME:   /home/vagrant/tomcat9
Using CATALINA_TMPDIR: /home/vagrant/tomcat9/temp
Using JRE_HOME:        /usr
Using CLASSPATH:       /home/vagrant/tomcat9/bin/bootstrap.jar:/home/vagrant/tomcat9/bin/tomcat-juli.jar
Tomcat started.
[user@localhost bin]$

- Open your local browser and point your URL to http://localhost:8080 to display Apache Tomcat


In-order to deploy jenkins war file click on "Manager App" , provide credentials written in tomcat-users.xml
In deploy section write your context path and WAR file to be deloyed


Once above is completed, it will be deployed and in the Application and click on Jenkins, you need to unlock Jenkins by providing password located in your home directory. 
#cat /home/user/.jenkins/secret/initialAdminPassword


Once they are unlocked, install the suggested plugins and get started. Create your First Admin user and Jenkins is ready