Monday 3 August 2020

Monitor PR for merge into master using TeamCity

You would have an automated build using teamcity, however we could use an PR and once they are manually verified and approved we could proceed to merge for master. 

Modify the branch specifications +:refs/pull/*/merge


Once you add the some file in the "feature" branch, it would create an build as we are watching this build in the teamcity. 

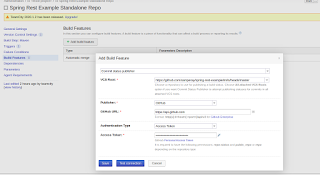
You need to edit the Build Feature and modify the below settings to ensure you have PR for the the build to merge master branch


Once you create a new file in the feature branch, create PR and wait for the build to succeed in the feature branch. 
Once the build is successful it will perform checks for the PR and once the changes are fine fo you, you can merge to master. 


So you have now all the changes from the branch to be in master. Once you have approved the changes, it will start to build to master.


This is how you can configure teamcity to have an manual approach for merging into master branch.

AutoMerge Branch to Master using TeamCity

Create a new VCS repository providing github. I have configured the repository in the root directory of the VCS in the teamcity project. 

<Root project> Contains all other projectsEdit


Created a new branch "feature" and would be modifying the code, once the changes are merged and build is successful then it would automatically merge to the master branch.

Modify the VCS in the "Branch Specification" as +:refs/heads/* which lets the teamcity to check for branches other than the master. 


Select "Triggers" and select for auto trigger from the VCS.

Select "Build Features" and select "Automerge changes" in watch build in branch +:feature when new build is created.


Ensure, you have an agent being attached to the VCS to execute the build.


Sunday 2 August 2020

TeamCity Server and BulidAgent installations on Centos 7

TeamCity is a Java-based build management and continuous integration server from JetBrains.  
A Freemium license for up to 20 build configurations and 3 free Build Agent licenses is available.

Prerequisites

- Centos 7 to be installed.
- Java to be installed 
- postgresql to be installed. 

Java Installations
# sudo yum install java-1.8.0-openjdk

Postgresql Installations

Install postgresql
# sudo yum install postgresql-server postgresql-contrib

Initialize the database
# sudo postgresql-setup initdb

Start the database
# sudo systemctl start postgresql

Enable postgresql during boot
# sudo systemctl enable postgresql

TeamCity Installations
Download Teamcity tar archive from official website

mkdir /opt/teamcity
cd /opt/teamcity
wget https://download.jetbrains.com/teamcity/TeamCity-2020.1.2.tar.gz
tar -xzvf TeamCity-2020.1.2.tar.gz

Download PostgreSQL JDBC driver
We need to download PostgreSQL JDBC driver in order to use PostgreSQL database for TeamCity.

mkdir -p /opt/teamcity/TeamCity/.BuildServer/lib/jdbc/
wget https://jdbc.postgresql.org/download/postgresql-42.2.14.jar -P /opt/teamcity/TeamCity/.BuildServer/lib/jdbc/

Start service
# cd /opt/teamcity/TeamCity/bin
# ./startup.sh

Stop Service
# ./shutdown.sh

Restart Service
# ./shutdown.sh && ./startup.sh

Configure postgresql
sudo su - postgres
vim data/pg_hba.conf

Modify to md5 at the end for these below lines
# "local" is for Unix domain socket connections only
local   all             all                                     md5
# IPv4 local connections:
host    all             all             127.0.0.1/32            md5
# IPv6 local connections:
host    all             all             ::1/128                 md5
# exit
# systemctl restart postgresql

# psql -U postgres
postgres=# CREATE USER teamcity WITH PASSWORD 'teamcity';
CREATE ROLE
postgres=# CREATE DATABASE teamcity OWNER teamcity;
CREATE DATABASE
postgres=# \q

TeamCity Web
point your browser to teamcity Server IP address and follow these below steps

Step 1: Change the Data DirectoryHere
we will change the data directory to /opt/teamcity/TeamCity/.BuildServer

Step 2: Now we have to setup database connection

Database host[:port] - localhost
Database name: xxxxxx
User name: xxxxxx
Password: xxxxx

Step 3: Accept licence

Step 4: Create Admin account

TeamCity installations has been completed. 

TeamCity BuildAgent Installations
Download Zipfile
We need to download a zip file from the teamcity server to install it on the agent. Replace the server-url with your server ip or server hostname.

mkdir /opt/teamcity
sudo unzip buildAgent.zip
sudo chmod +x bin/agent.sh
vim buildAgent.dist.properties
serverUrl=http://server-ip:8111/
cp conf/buildAgent.dist.properties conf/buildAgent.properties

Start Service
# cd /opt/teamcity/buildAgent/bin
# ./agent.sh

You would need to authorize the agent in the buildserver once its get detected. you can now start your build and work along.